Node [string[]]
With the DOT specification, a node will be created any time it is references. So if you create a bunch of edges to nodes, that will create those nodes on the graph.
You use the node command for two reasons. To specify attributes or to place a node in a specific subgraph.
Node [string[]] -Attribute [hashtable]
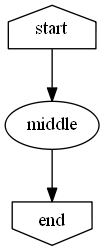
Here is an example of specifying attributes for a node.
graph g {
    node start @{shape='house'}
    edge start,middle,end
    node end @{shape='invhouse'}
}
You can specify multiple nodes at once just like you can edges.
graph g {
    node one,three @{shape='rectangle'}
    edge one,two,three,four
}

Node Advanced
Node [hashtable]
You can specify default node attributes and any node that gets defined down script will inherit those values.
graph g {
    node @{shape='rectangle'}
    edge a,b,c,a
}
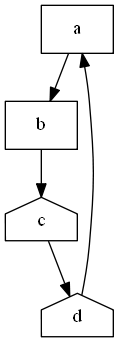
You can also redefine the default values as you go along.
graph g { node @{shape='rectangle'} edge a,b node @{shape='house'} edge b,c,d,a }
Node [Object[]] -NodeScript [scriptblock]
Just like with the scripted specification on the edge, node supports them too.
graph g {
    node $csv -NodeScript {$_.UserName}
}
This allows you to pass in the full list of objects and then provide a script to pull the value. This is a very simple example, but this gives you a lot of flexibility. Where you can call any function in line if needed
graph g {
    node $csv -NodeScript {(Get-ADUser $_.username).name}
}
pipeline support
You can pipe objects to the node command.
graph g {
    $csv | node -NodeScript {(Get-ADUser $_.username).name}
}
I generally don't use this syntax but I wanted to give the user the flexibility.
Node -Attribute @{key=[scriptblock]}
This is one of the more creative features on this command. It allows you to specify a [ScriptBlock] for object properties.
graph g {
    node $csv -NodeScript {$_.username} @{label={$_.name}}
}
You can either pull values directly from the object or to a per object calculation. There are lots of use cases for this.
# more verbose labels
graph g {
    node $csv -NodeScript {$_.username} @{label={'{0} : {1}' -f $_.name, $_.department}}
}

# using a lookup table
$colors = @{
    Admin = 'RED'
    'IT' = 'Blue'
}
graph g {
    node $csv -NodeScript {$_.username} @{shape='rect';style='filled';color={$colors[$_.department]}}
}

# using in line calculations
graph g {
    node $csv -NodeScript {$_.username} @{shape={if($_.department -eq 'Admin'){'rectangle'}else{'circle'}}}
}
[object].Where([ScriptBlock])
This is also a good time to point out that you can use the Where function quite nicely with the node command. In any cases this will be easyer to work with.
graph g {
    node $csv.where({$_.department -eq 'Admin'}) -NodeScript {$_.username} @{shape='rect';style='filled';color='Red'}
    node $csv.where({$_.department -eq 'IT'}) -NodeScript {$_.username} @{shape='rect';style='filled';color='Blue'}
}
But you can still use the classic pipeline to do this too.
graph g {
    $csv | where department -eq 'Admin' | node -NodeScript {$_.username} @{shape='rect';style='filled';color='Red'}
    $csv | where department -eq 'IT' | node -NodeScript {$_.username} @{shape='rect';style='filled';color='Blue'}
}